OpenCVの構成
OpenCVは主に5種類のライブラリから成り立っており,以下にその構成を示す.
- CV→画像処理
- MLL→統計的要素
- HighGUI→GUI,画像/ビデオの入出力
- CXCORE→基本構造体,描画関数
- CVAUX→実験的な関数
基本的にCXCOREに含まれる画像用構造体である「IplImage」をCVに含まれる関数で処理を行う
- IplImage
OpenCVで用いられている構造体は基本的にオブジェクト指向により設計されており,IplImageは以下の構成になる
CvArr→CvMat→IplImage
画像構造体は行列を継承して作られ,行列は配列を継承して作られる
以下,OpenCVリファレンスより引用
typedef struct _IplImage
    {
        int  nSize;         /* sizeof(IplImage) */
        int  ID;            /* バージョン (=0)*/
        int  nChannels;     /* OpenCV のほとんどの関数が,1,2,3および4チャンネルをサポートする */
        int  alphaChannel;  /* OpenCV では無視される */
        int  depth;         /* ピクセルの色深度のビット数:
                               IPL_DEPTH_8U, IPL_DEPTH_8S, IPL_DEPTH_16U,
                               IPL_DEPTH_16S, IPL_DEPTH_32S,
                               IPL_DEPTH_32F, IPL_DEPTH_64F がサポートされる */
        char colorModel[4]; /* OpenCV では無視される */
        char channelSeq[4]; /* 同上 */
        int  dataOrder;     /* 0 - インタリーブカラーチャンネル.1 - 分離カラーチャンネル,
                               cvCreateImage が作成できるのは,インタリーブ画像のみ.*/
        int  origin;        /* 0 - 左上原点,
                               1 - 左下原点(Windowsのビットマップ形式) */
        int  align;         /* 画像の行のアライメント(4 あるいは 8).
                               OpenCV はこれを無視して,代わりに widthStep を使用する. */
        int  width;         /* 画像のピクセル幅 */
        int  height;        /* 画像のピクセル高さ */
        struct _IplROI *roi;/* 画像 ROI.これが NULL でない場合,この特定の領域が処理の対象となる */
        struct _IplImage *maskROI; /* OpenCV では必ずNULL */
        void  *imageId;     /* 同上 */
        struct _IplTileInfo *tileInfo; /* 同上 */
        int  imageSize;     /* 画像データのバイトサイズ
                               (インタリーブデータの場合は,=image->height*image->widthStep) */
        char *imageData;    /* アライメントが調整された画像データへのポインタ */
        int  widthStep;     /* アライメントが調整された画像の行のバイトサイズ */
        int  BorderMode[4]; /* 画像境界の設定.OpenCV では無視される */
        int  BorderConst[4]; /* 同上 */
        char *imageDataOrigin; /* オリジナル画像データへのポインタ
                                  (アライメントが調整されているとは限らない)
                                  - これは画像を正しく解放するために必要. */
    }
    IplImage;
このステータスのうち,特に重要なのは
- nChannels
- depth
であり,扱うチャンネル数によって適応できる関数が限られる
基本的にチャンネル数が1である画像は白黒のグレースケール画像であり
チャンネル数が3の画像はRGBおよびHSV等の表色系で表されるカラー画像である
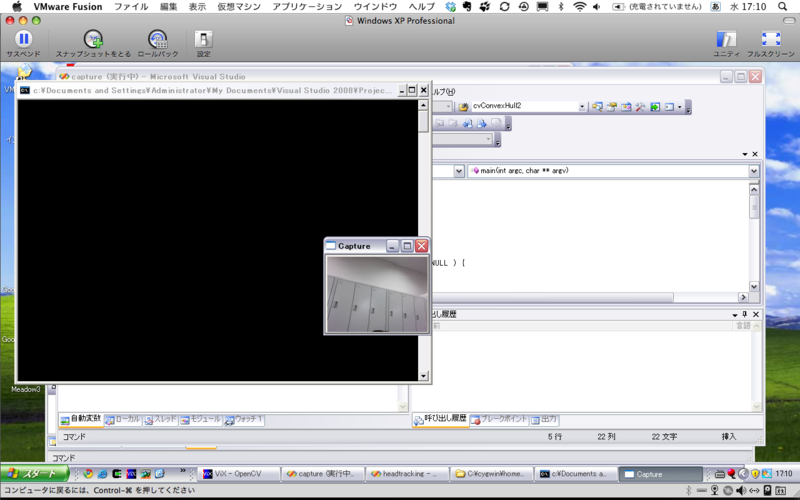
PCに接続したカメラから動画像を取得する
以下のコードでPCに接続したカメラから動画像を取得することができる
#include <cv.h>
#include <highgui.h>
#include <ctype.h>

int main (int argc, char **argv)
{
  int key;
  CvCapture *capture = NULL;

//(1)カメラ情報の取得
  if( ( capture = cvCreateCameraCapture( 0 ) ) == NULL ) {
    return -1;
  }

//(2)動画像取得
   IplImage *frame = cvQueryFrame (capture);

//(3)取得する動画像のフレームサイズのセット
  cvSetCaptureProperty (capture, CV_CAP_PROP_FRAME_WIDTH, frame->width);
  cvSetCaptureProperty (capture, CV_CAP_PROP_FRAME_HEIGHT, frame->height);

//(4)取得した動画像を表示する為のフレーム生成
  cvNamedWindow ("Capture", CV_WINDOW_AUTOSIZE);

//(5)メインループ
  while (1) {
//(6)動画像の取得、表示
    frame = cvQueryFrame( capture );
    cvShowImage ("Capture", frame);

//(7)キーイベントの登録
    key = cvWaitKey (10);
    if (key == 'q')
      break;
  }

//(8)確保していたメモリの解放
  cvReleaseCapture (&capture);
  cvDestroyWindow ("Capture");

  return 0;
}
OpenCVの開発環境を整える~Windows編(XP)~
Windows環境では前述のUNIX環境の様にCygwinなどを用いてg++でコードをコンパイルすることもできるが、今回は開発環境としてVisual Studioを使用する

・Visual Studio 2008 Professional
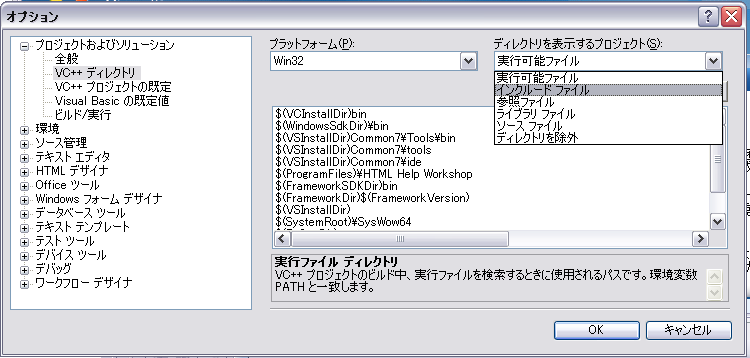
VCを起動させてツールバーから
ツール→オプション
プロジェクト及びソリューション→VC++ディレクトリ を選択

右上の
ディレクトリを表示する→インクルードファイル
新しい行を追加する を選択し以下のパスを追加する
C\Program Files\OpenCV\othorlibs\highgui
C\Program Files\OpenCV\cv\include
C\Program Files\OpenCV\cvaux\include
C\Program Files\OpenCV\cxcore\include

ディレクトリを表示する→ライブラリファイル

新しい行を追加する を選択し以下のパスを追加する
C\Program Files\OpenCV\lib

以上の入力により、Visual StudioにOpenCVを利用するためのリンクが張られる。この操作はプロジェクト作成ごとにする必要はない。
プロジェクトを作成する
ツールバーから
ファイル→新規作成→プロジェクト
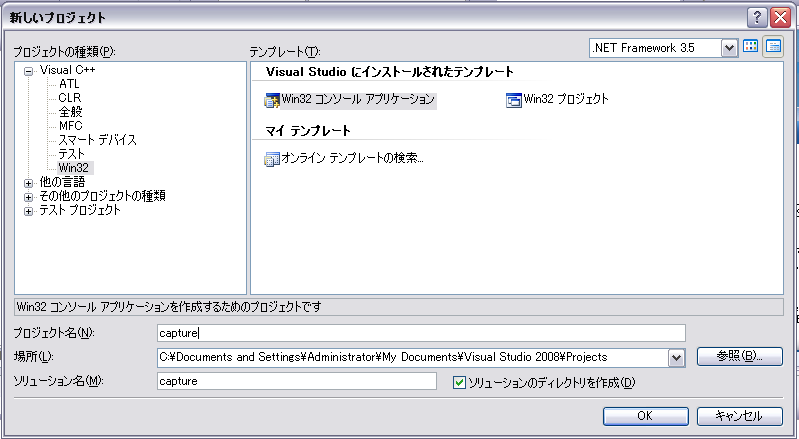
Visual C++→Win32→Win32コンソールアプリケーション を選択
プロジェクト名を入力
今回は「capture」とした
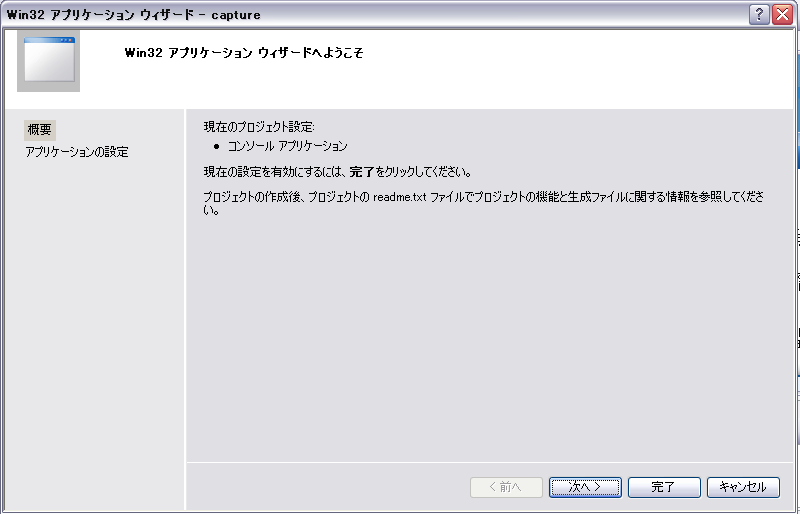
次へ

コンソールアプリケーション→空のプロジェクト を選択して次へ
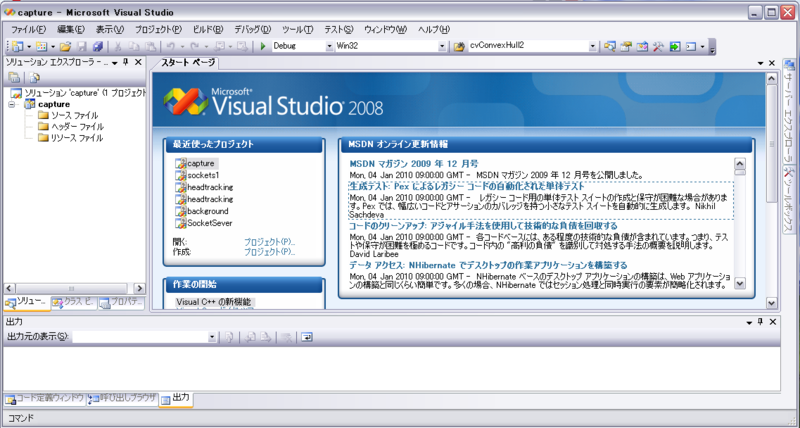
作成したプロジェクトのリンカの設定を行う
プロジェクトを右クリックし、プロパティを開く
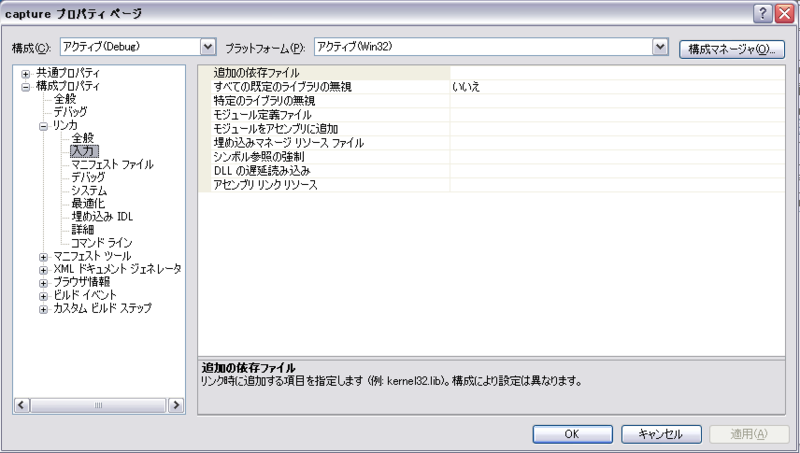
構成プロパティ→リンカ→入力→追加の依存ファイル を選択
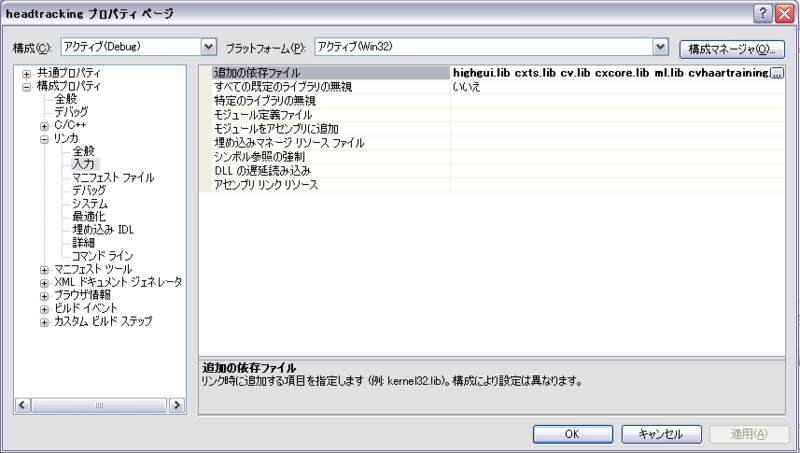
以下のファイルを追加する
highgui.lib cxts.lib cv.lib cxcore.lib ml.lib cvhaartraining.lib
ソースファイルの作成を行う
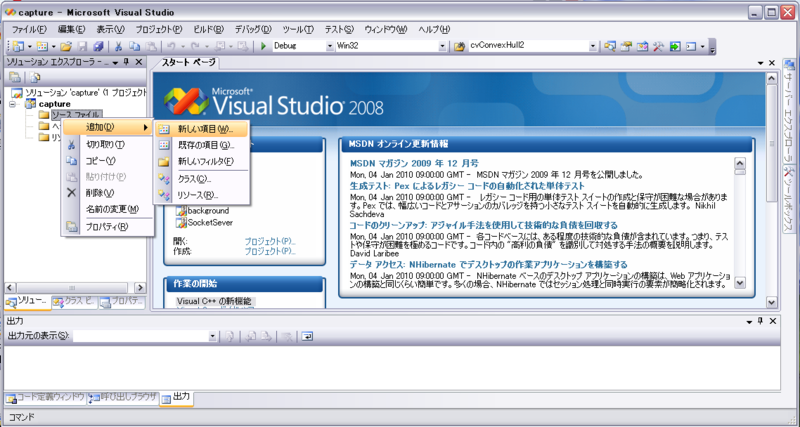
capture→ソースファイル→追加→新しい項目 を選択
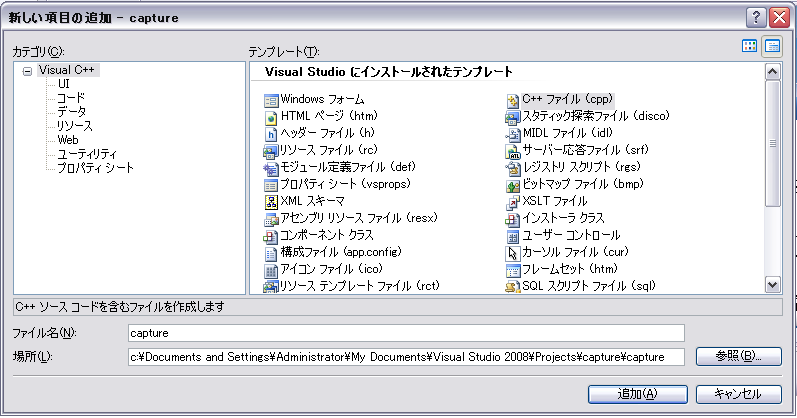
C++ファイルを選択し、ファイル名を入力する
今回はプロジェクト名と同じく「capture」とした

テキストエディター部分にコードを入力する
今回入力したコードを以下に示す
#include <cv.h>
#include <highgui.h>
#include <ctype.h>

int main (int argc, char **argv)
{
  int key;
  CvCapture *capture = NULL;

  if( ( capture = cvCreateCameraCapture( 0 ) ) == NULL ) {
    return -1;
  }
   IplImage *frame = cvQueryFrame (capture);

  cvSetCaptureProperty (capture, CV_CAP_PROP_FRAME_WIDTH, frame->width);
  cvSetCaptureProperty (capture, CV_CAP_PROP_FRAME_HEIGHT, frame->height);

  cvNamedWindow ("Capture", CV_WINDOW_AUTOSIZE);

  while (1) {
    frame = cvQueryFrame( capture );
    cvShowImage ("Capture", frame);
    key = cvWaitKey (10);
    if (key == 'q')
      break;
  }

  cvReleaseCapture (&capture);
  cvDestroyWindow ("Capture");

  return 0;
}
OpenCVインストール手順〜Debian編(Debian 2.6.26-17lenny2)〜
下準備としてOpenCVインストールに必要なパッケージを入れる
$ sudo apt-get install g++
$ sudo apt-get install debhelper libgtk2.0-dev
$ sudo apt-get install python-dev python-support quilt swig zlib1g-dev
Macの時と同じファイルであるOpenCV1.1preをSourceForgeから落としてくる
http://sourceforge.net/projects/opencvlibrary/files/
$ sudo wget http://sourceforge.net/projects/opencvlibrary/files/opencv-unix/1.1pre1/opencv-1.1pre1.tar.gz/download
解凍する
$ tar zxfv opencv-1.1pre1.tar.gz
configureの設定
$ ./configure --with-python CPPFLAGS="-I/opt/local/include" LDFLAGS="-L/opt/local/lib"

General configuration ================================================
    Compiler:                 g++
    CXXFLAGS:
    DEF_CXXFLAGS:             -Wall -fno-rtti -pipe -O3 -g -march=i686 -ffast-math -fomit-frame-pointer  -msse2
    PY_CXXFLAGS:              -Wall -pipe -O3 -g -march=i686 -ffast-math -fomit-frame-pointer  -msse2
    OCT_CXXFLAGS:             -fno-strict-aliasing -Wall -Wno-uninitialized -pipe -O3 -g -march=i686 -ffast-math -fomit-frame-pointer  -msse2

    Install path:             /usr/local

HighGUI configuration ================================================

    Windowing system --------------
    Use Carbon / Mac OS X:    no
    Use gtk+ 2.x:             yes
    Use gthread:              yes

    Image I/O ---------------------
    Use ImageIO / Mac OS X:   no
    Use libjpeg:              yes
    Use zlib:                 yes
    Use libpng:               yes
    Use libtiff:              yes
    Use libjasper:            yes
    Use libIlmImf:            no

    Video I/O ---------------------
    Use QuickTime / Mac OS X: no
    Use xine:                 no
    Use gstreamer:            no
    Use ffmpeg:               yes
    Use dc1394 & raw1394:     no
    Use v4l:                  yes
    Use v4l2:                 yes
    Use unicap:               no

Wrappers for other languages =========================================
    SWIG
    Python                    yes
    Octave                    no

Additional build settings ============================================
    Build demo apps           yes
エラーが出ていないのを確認
Macとの違いはgtk2を使ってることと、Video I/Oにffmpegを使ってること。
次はmake
$ make
インストール
$ sudo make install
必要なリンクを作成
$ ldconfig
$ sudo sh ./build_all.sh
コンパイルが終わったらサンプルを実行してみる
$ ./image
OpenCVインストール手順~Windows編(XP)~
WindowsではUNIX環境と違って、インストーラが用意されているのでソースコードからコンパイルする必要はありません
http://sourceforge.net/projects/opencvlibrary/files/
からWindows用の1.1preインストーラを落としてきます

OpenCV_1.1pre1a.exe
を実行すると、次のようなウィンドウが出てくる

かまわずNext
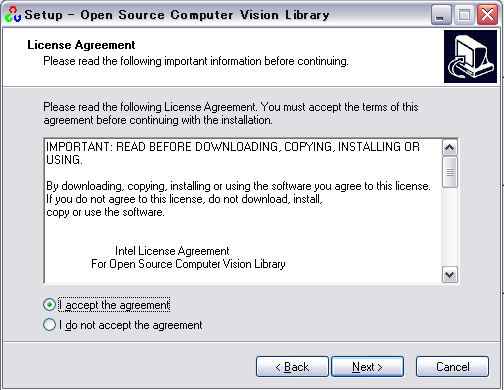
I accept the agreementに
チェック入れてNext

インストール先フォルダの決定。ここはデフォルトのままProgram Files直下に作成してNext

StartMenuに登録するフォルダの決定。特に気にすることは無いのでそのままNext

システム環境変数にパスを通すかどうか。後でちゃんと通っているか確認するけど取りあえずチェックしてNext

この設定で問題無ければNext

1分くらい待つ

インストール終了。別にドキュメントは見に行かなくてもいい

C:\Program Files\OpenCVがあるか確認
次はシステムに環境変数を通す作業

マイコンピュータのプロパティから詳細設定→環境変数をクリック

下段のシステム環境変数のPathを選択して編集をクリック

変数値の末尾にc:\Program Files\OpenCV\binあるか確認
無ければ追加する。
このとき繋ぎに「;」を入力するのを忘れないように
以上で基本的な設定完了。
サンプルアプリケーションを動かしてみる
OpenCVの開発環境を整える~Mac編~
とりあえず、マシンに接続されたカメラから動画像を取得して表示するだけのサンプルアプリケーションを作成する
以下のコードを適当にimage.cppとかにして保存
#include <cv.h>
#include <highgui.h>
#include <ctype.h>

int main (int argc, char **argv)
{
  int key;
  CvCapture *capture = NULL;

  if( ( capture = cvCreateCameraCapture( 0 ) ) == NULL ) {
    return -1;
  }
   IplImage *frame = cvQueryFrame (capture);

  cvSetCaptureProperty (capture, CV_CAP_PROP_FRAME_WIDTH, frame->width);
  cvSetCaptureProperty (capture, CV_CAP_PROP_FRAME_HEIGHT, frame->height);

  cvNamedWindow ("Capture", CV_WINDOW_AUTOSIZE);

  while (1) {
    frame = cvQueryFrame( capture );
    cvShowImage ("Capture", frame);
    key = cvWaitKey (10);
    if (key == 'q')
      break;
  }

  cvReleaseCapture (&capture);
  cvDestroyWindow ("Capture");

  return 0;
}
今回はこのコードをgcc/g++を用いてコンパイルします
コードの解説はいずれ。
$ g++ -o image image.cpp `pkg-config --cflags --libs opencv`
でコンパイルできるけど、今後のことも考えてMakefileを作成します。
以下のコードをimage.cppと同じ階層にMakefileとして保存
CXX = g++
CXXFLAGS = `pkg-config --cflags opencv`
LDFLAGS = `pkg-config --libs opencv`
TARGET = $@
SOURCE = $@.cpp

TARGET:
	$(CXX) -o $(TARGET) $(SOURCE) $(CXXFLAGS) $(LDFLAGS)

.PHONY: clean
clean:
	rm -f *.o *~
これで準備オッケー
ターミナルから以下をタイプ
$ make image
g++ `pkg-config --cflags opencv`  `pkg-config --libs opencv`  image.cpp   -o image

$ ./image
でiSightが起動したら成功。
ちなみに「q」でアプリケーション終了
makeが上手くいかない場合はきっとパスが通っていないんだろう
$ export PKG_CONFIG_PATH=/usr/local/lib/pkgconfig/
をタイプしてみる
.bashrcに書き込んでおくとよい
OpenCVインストール手順〜Mac編(10.5.8Leopard)〜
MacPortsというMacOSX上で動作するパッケージシステムでOpenCVについて調査する
$ port search opencv
opencv @1.0.0 (graphics, science)
    Intel(R) Open Source Computer Vision Library
OpenCVと依存関係にあるパッケージを「info」コマンドを用いて調査する
$ port info opencv @1.0.0
opencv @1.0.0 (graphics, science)
Variants:             universal

Description:          opencv is a library that is mainly aimed at real time computer vision. Some example areas would be Human-Computer Interaction (HCI),
                      Object Identification, Segmentation and Recognition, Face Recognition, Gesture Recognition, Motion Tracking, Ego Motion, Motion
                      Understanding, Structure From Motion (SFM), and Mobile Robotics.
Homepage:             http://www.intel.com/technology/computing/opencv/

Library Dependencies: gtk2, zlib, jpeg, libpng, tiff
Platforms:            darwin
License:              unknown
Maintainers:          stante@gmail.com
OpenCVと依存関係にあるパッケージは「gtk2, zlib, jpeg, libpng, tiff」であることがわかる
OpenCVをインストールする前にこれらのパッケージをインストールする必要がある
これらのパッケージに関しても同様に依存関係の調査を行う
$ port info gtk2
gtk2 @2.18.2 (x11)
Variants:             darwin_7, darwin_8, no_x11, quartz, universal, [+]x11

Description:          This is GTK+ version 2.x. GTK+, which stands for Gimp ToolKit, is a library for creating GUIs for the X Windows System.
Homepage:             http://www.gtk.org/

Build Dependencies:   pkgconfig
Library Dependencies: cairo, fontconfig, freetype, glib2, jpeg, tiff, libiconv, libpng, jasper, atk, pango, gettext, zlib, xorg-libXi, xorg-libXrandr,
                      xorg-libXcursor, xorg-libXinerama, xorg-libXdamage, xorg-libXcomposite, xorg-libXfixes
Runtime Dependencies: shared-mime-info
Platforms:            darwin
License:              unknown
Maintainers:          nox@macports.org, openmaintainer@macports.org
どうやらpkgconfigも入れる必要があるようだ。
しかしgtk2はX11が入ってたら必要無いようなので、今回はgtk2自体はインストールしないがpkgconfigは必要なのでインストールする。
$ port install pkgconfig
$ port install zlib jpeg libpng tiff
これで準備オッケー
本命のOpenCVを入れるが、今回MacPortからは1.0しか見つからなかったけど、1.1preバージョンを入れたいので
http://sourceforge.net/projects/opencvlibrary/files/
から1.1preのソースコードを落としてくる
そして解凍した後、configureの設定をする為にhelp参照
$ ./configure --help
`configure' configures opencv 1.1.0 to adapt to many kinds of systems.

Usage: ./configure [OPTION]... [VAR=VALUE]...

To assign environment variables (e.g., CC, CFLAGS...), specify them as
VAR=VALUE.  See below for descriptions of some of the useful variables.

Defaults for the options are specified in brackets.

Configuration:
  -h, --help              display this help and exit
      --help=short        display options specific to this package
      --help=recursive    display the short help of all the included packages
  -V, --version           display version information and exit
  -q, --quiet, --silent   do not print `checking...' messages
      --cache-file=FILE   cache test results in FILE [disabled]
  -C, --config-cache      alias for `--cache-file=config.cache'
  -n, --no-create         do not create output files
      --srcdir=DIR        find the sources in DIR [configure dir or `..']

Installation directories:
  --prefix=PREFIX         install architecture-independent files in PREFIX
                          [/usr/local]
  --exec-prefix=EPREFIX   install architecture-dependent files in EPREFIX
                          [PREFIX]

By default, `make install' will install all the files in
`/usr/local/bin', `/usr/local/lib' etc.  You can specify
an installation prefix other than `/usr/local' using `--prefix',
for instance `--prefix=$HOME'.

For better control, use the options below.

Fine tuning of the installation directories:
  --bindir=DIR           user executables [EPREFIX/bin]
  --sbindir=DIR          system admin executables [EPREFIX/sbin]
  --libexecdir=DIR       program executables [EPREFIX/libexec]
  --sysconfdir=DIR       read-only single-machine data [PREFIX/etc]
  --sharedstatedir=DIR   modifiable architecture-independent data [PREFIX/com]
  --localstatedir=DIR    modifiable single-machine data [PREFIX/var]
  --libdir=DIR           object code libraries [EPREFIX/lib]
  --includedir=DIR       C header files [PREFIX/include]
  --oldincludedir=DIR    C header files for non-gcc [/usr/include]
  --datarootdir=DIR      read-only arch.-independent data root [PREFIX/share]
  --datadir=DIR          read-only architecture-independent data [DATAROOTDIR]
  --infodir=DIR          info documentation [DATAROOTDIR/info]
  --localedir=DIR        locale-dependent data [DATAROOTDIR/locale]
  --mandir=DIR           man documentation [DATAROOTDIR/man]
  --docdir=DIR           documentation root [DATAROOTDIR/doc/opencv]
  --htmldir=DIR          html documentation [DOCDIR]
  --dvidir=DIR           dvi documentation [DOCDIR]
  --pdfdir=DIR           pdf documentation [DOCDIR]
  --psdir=DIR            ps documentation [DOCDIR]

Program names:
  --program-prefix=PREFIX            prepend PREFIX to installed program names
  --program-suffix=SUFFIX            append SUFFIX to installed program names
  --program-transform-name=PROGRAM   run sed PROGRAM on installed program names

System types:
  --build=BUILD     configure for building on BUILD [guessed]
  --host=HOST       cross-compile to build programs to run on HOST [BUILD]
  --target=TARGET   configure for building compilers for TARGET [HOST]

Optional Features:
  --disable-FEATURE       do not include FEATURE (same as --enable-FEATURE=no)
  --enable-FEATURE[=ARG]  include FEATURE [ARG=yes]
  --enable-static[=PKGS]  build static libraries [default=no]
  --disable-dependency-tracking  speeds up one-time build
  --enable-dependency-tracking   do not reject slow dependency extractors
  --enable-shared[=PKGS]  build shared libraries [default=yes]
  --enable-fast-install[=PKGS]
                          optimize for fast installation [default=yes]
  --disable-libtool-lock  avoid locking (might break parallel builds)
  --enable-debug          build debug version without optimization [no]
  --enable-apps           build demo applications [yes]
  --enable-sse2           enable SSE2 intrinsics [yes]
  --enable-openmp         enable OpenMP threading [automatic]

Optional Packages:
  --with-PACKAGE[=ARG]    use PACKAGE [ARG=yes]
  --without-PACKAGE       do not use PACKAGE (same as --with-PACKAGE=no)
  --with-gnu-ld           assume the C compiler uses GNU ld [default=no]
  --with-pic              try to use only PIC/non-PIC objects [default=use
                          both]
  --with-tags[=TAGS]      include additional configurations [automatic]
  --with-swig             use swig wrapper generator [no]
  --with-python           use python for wrapping [yes]
  --with-octave           use octave for wrapping [no]
  --with-xine             use xine libraries (see LICENSE) [no]
  --with-gstreamer        use gstreamer multimedia framework (see LICENSE)
                          [no]
  --with-ffmpeg           use ffmpeg libraries (see LICENSE) [automatic]
  --with-1394libs         use libraw1394/libdc1394 [automatic]
  --with-v4l              use video4linux [automatic]
  --with-unicap           use unicap (see LICENSE) [no]
  --with-imageio          use ImageIO libraries [automatic]
  --with-quicktime        use QuickTime libraries [automatic]
  --with-carbon           use Carbon windows [automatic]
  --with-gtk              use gtk+ 2.0 windows [automatic]
  --with-gthread          use gthread in addition to gtk+ [automatic]

Some influential environment variables:
  CXX         C++ compiler command
  CXXFLAGS    C++ compiler flags
  LDFLAGS     linker flags, e.g. -L<lib dir> if you have libraries in a
              nonstandard directory <lib dir>
  LIBS        libraries to pass to the linker, e.g. -l<library>
  CPPFLAGS    C/C++/Objective C preprocessor flags, e.g. -I<include dir> if
              you have headers in a nonstandard directory <include dir>
  CC          C compiler command
  CFLAGS      C compiler flags
  CPP         C preprocessor
  CXXCPP      C++ preprocessor
  F77         Fortran 77 compiler command
  FFLAGS      Fortran 77 compiler flags
  PYTHON      Python Executable Path
  SWIG        Simplified Wrapper and Interface Generator, used for Python
              bindings

Use these variables to override the choices made by `configure' or to help
it to find libraries and programs with nonstandard names/locations.

Report bugs to <opencvlibrary-devel@lists.sourceforge.net>.
Pythonからも使いたいので追加しておく
$ ./configure --with-python CPPFLAGS="-I/opt/local/include" LDFLAGS="-L/opt/local/lib"

General configuration ================================================
    Compiler:                 g++
    CXXFLAGS:                 -Wall -fno-rtti -pipe -O3 -g -march=prescott -ffast-math -fomit-frame-pointer

    Install path:             /usr/local

HighGUI configuration ================================================

    Windowing system --------------
    Use Carbon / Mac OS X:    yes
    Use gtk+ 2.x:             no
    Use gthread:              no

    Image I/O ---------------------
    Use libjpeg:              yes
    Use zlib:                 yes
    Use libpng:               yes
    Use libtiff:              yes
    Use libjasper:            no
    Use libIlmImf:            no

    Video I/O ---------------------
    Use QuickTime / Mac OS X: yes
    Use xine:                 no
    Use ffmpeg:               no
    Use dc1394 & raw1394:     no
    Use v4l:                  no
    Use v4l2:                 no

Wrappers for other languages =========================================
    SWIG
    Python                    yes

Additional build settings ============================================
    Build demo apps           yes
エラーが出ていないのを確認して、次はmake
$ make
そんでもって
$ sudo make install
インストールが終わったらpkg-configのパスを通しておく
$ export PKG_CONFIG_PATH=/usr/local/lib/pkgconfig/
そしたらサンプル動かしてみよう
どうやらbuild_all.shってのでサンプル全部コンパイルしてくれるみたいなので実行
$ sh build_all.sh
無事コンパイルが終わったらサンプル実行
$ ./facedetect
iSightが起動して顔認識アプリで遊べたらOK

